Thursday, February 8, 2018

PDF document Important points in UIPath


PDF will contain Native text or scanned copy data.

1.       Text and images will contain PDF documents
2.       Large texts or specific texts
3.       Read PDF text activity to read PDF text data but it won’t read image based data
4.       Read PDF will contain Range parameter, which will used for complete doc (ALL pages) or specific pages or one particular page.

OCR Based PDF activity
1.       Google or Microsoft or Abbyy
2.       Different engines have different parameters
3.       OCR quality is not good and it will more imply with original document
4.       Which is not preferable most of the time because of information will not segregated as per original PDF document
5.       Whenever possible to use non OCR methods
6.       OCR will read image along with text of the PDF documents

Screen scraping
1.        In screen scraping document will display as per original like spaces and lines as well


Specific element extraction In PDF document
1.       Get text activity will extract specific element
2.       Get text element will use selector to extract specific element for the similar PDF documents
3.       In selector Attach to live element will easy to fix for specific element
4.       In selector open ui explorer we can use to modify as per our requirements and it give new selector information.

Another Based activity

1.       Anchor based activity
a.       In Anchor based activity we will use find element activity to modify the selector for wildcard so that it can be useful when same doc contain different values
b.      Which contain Anchor position which will more useful, where the value is present and will pick it from easily
c.       It will work for same structure PDF file
d.      Which is more flexible compare with earlier ones
e.      It’s more reliable  
f.         
For screen scraping and Anchor based element PDF document should be in open status otherwise Uipath will through an error

Thursday, February 1, 2018

How do I fix the "Trial Version Expired" error---UiPath(RPA)

If you already have a registered version of UiPath Studio but you're still getting the "Trial Version Expired" message,  you can easily resolve this issue by following two simple steps:
Step 1. Run the Activation.exe file by following this path: C:\Program Files (x86)\UiPath Studio\v8\UiPath. You might have a different version of UiPath. You can easily search for the Activation.exe file by typing it in the Search bar.
 
TrialVersion1
 
Step 2. This will pull-up a dialog box to update your registration. Enter the email address you used to register, and the registration code.
 
 
Step 3. Click the Activate button once done.

How to simulate Excel VLookup in a Datatable. Filter Datatable---UiPath(RPA)

Note: This Workflow was created with the 8.0 version.
Given this Excel file, we want to retrieve the value corresponding to a given index.
Excel.png
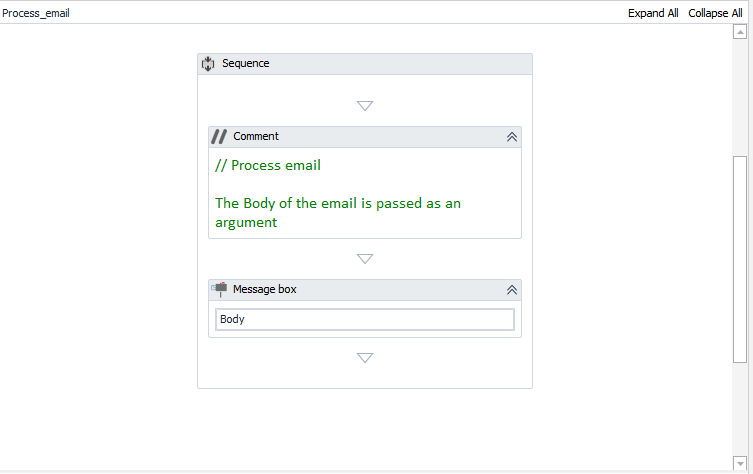
This is how it's done with UiPath:

Step 1: Read The Excel File

readrange.jpg
I used the Read Range Activity. Be sure to check the "Add Headers" property of the Read Range activity in order to be able to use column names later in your automation. Also, I used the workbook retrieved by the Open Workbook activity; the data is stored in a datatable.
readrangeoptions.jpg

Step 2: Set the lookup value

This is a simple assignment operation where we can change our lookup index:

lookup_value-1.pngStep 3: Lookup Using For Each

for_Each.pngThis is quite self explanatory. The key here is to set the correct condition: row("Index").ToString = indexToLookup 

Step 4. Lookup using Datatable Select method

Datatable_Select.pngKey points:
1. The select string is initalized with "Index = '{0}'":
selString.png 
2. The string.Format that will return the correct select: "Index = '2'":
3. The datatable.Select activity that returns an array of rows:  dtInput.Select(selectString)
Workflow attached:

Email Automation. Mail Trigger Sample---UiPath(RPA)

Email triggers are the foundation of any email automation process. In the attached Mail_Trigger_Sample Workflow, the Inbox is checked every 60 seconds for fresh emails.


 Mail_Trigger_Sample_Flowchart.png

If a new email is detected and a certain condition is met (a specific Keyword is found in the Subject), then the message Body is passed as an argument to the Process_Email Workflow.
 

email_Trigger_ProcessEmailFlowchart.png

Workflow Steps:

1. Before running the Mail_Trigger_Sample workflow, you will need to set:

Email address:
email_trigger_SetEmail.png
 
Password:
 
Keyword:
email_trigger_SetKeyword.png


Also, please make sure you set your MailFolderPort, and Serverin the GetIMAPMailMessages activity properties. By default, the Workflow is configured to work with the Gmail settings.
 
email_trigger_IMAP_Settings.png
 
2. When the Workflow is running, it checks your email for new messages (using the GetIMAPMailMessages activity). If no new email is found, it waits for 60 seconds and then it tries again. You can change the waiting time to other value, within the Delayactivity.
email_trigger_SetDelay.png
3. If a new email is found, it is marked as read (you can change that by un-checking the MarkAsRead property in the GetIMAPMailMessages activity) 
4. The Workflow then checks if the email's subject contains the keyword.  If there's a match, the Process_Email Workflow is invoked and the email body is passed as an argument (Body)
5. The Process_Email Workflow will pop up a window with the message body.
 
Note: The workflows are created & tested with UiPath Studio 8.

Attachments:

Excel triggers - Get notified when a cell is updated---UiPath(RPA)

With UiPath you can monitor changes that take place on a specified file.
Monitor_Excel  workflow example focuses on monitoring the changes made to a specific cell from an Excel file.

When the Excel document is modified, the program looks in the F38 cell (where the "Total value of invoice" is stored). If that value has changed, it is sent as a parameter to the Excel_Value_Changed  workflow.
With this Excel automation  you will get notified each time the cell changes its value.

Workflow Steps:

1. In order to run the Monitor_Excel  workflow,  just save the files attached to this article (into the same folder) and run.
You can customize the workflow in order to use it with your own Excel file, by changing:
File name  - The name of the Excel file you will monitor
Path - The path to the folder that contains the file. In our example it is set to the current folder
Sheet and Cell  - "Invoice 1" and "F38" in our example
MonitorExcel_seq_v8.png
2. The program reads the total value of invoice (F38 cell) from the Excel document. This will be the initialValue  and we will monitor its change.
3. The monitoring of our Excel file starts - through the File Change Trigger activity. 
All possible change types will be considered (Created, Modifed, Deleted, Changed).
MonitorExcel_trigger_v8.png
4.  The program will detect any change in the Excel document properties. When a change takes place, the program will again read the F38 cell.
MonitorExcel_seqLogic.png
Note: The modified Excel file should be saved in order to activate the trigger.

5. If the value in F38 is different than it was initially, it is passed as an argument to the invoked Excel_Value_Changed workflow. A pop up with the new value is shown.
6. The current value becomes the new  initialValue that will be monitored for change.

Note: The workflows are created with UiPath Studio 8.
Attachments: 

How to do UI automation with locked screen---UiPath(RPA)

UiPath offers the possibility of executing an artifact even if the computer screen is locked. When a computer is in Locked Screen the Windows operating system does not create the UI of the applications that are still running underneath.

If your artifacts were developed for background automation then you will have no problems executing them under a locked screen. If they include any activity that works with Synthesize Input, Native or OCR scraping, or images, then you will need to make some changes in the way your workflow starts.

UiPath 7.5 comes with an application called TaskLauncher that allows you to start UiLauncher.exe and the artifact needed within a new Windows session, auto-logging a user if necessary. When the Windows session gets locked, TaskLauncher will automatically unlock the session to ensure that your workflow continues executing without errors.

The app can be found in %ProgramFiles%/UiPath Studio/v7/UiPath.Here you can find more information about it's arguments. Keep in mind that TaskLauncher works only if it is opened by a user with Administrator rights or SYSTEM, and the Windows system in Vista or higher.

You can automatically create a schedule in Windows Task Scheduling that starts the workflow by going into Setup tab and selecting Schedule Workflow.

This feature has been changed in the UiPath 8 version.

How to Integrate PowerShell into UiPath Workflows(RPA)

PowerShell is a complex framework developed by Microsoft that allows for task automation and configuration management.
We want to provide our users with the option to integrate PowerShell and its powerful capabilities into the UiPath workflows. Integration is made through the InvokePowerShell activity. Usage may differ from one workflow to another - you can invoke simple commands/cmdlets or run complex scripts and jobs.

In the attached example (ReadTextFile workflow), the InvokePowerShell activity is used two times:

1. To return all the .txt files from the current directory (the workspace of the workflow).
2. To get the content from each of the .txt files found in the current directory.

Workflow Steps


1. Create a .txt file (Example.txt), containing the text "PoweShell is awesome!". The WriteTxtFile activity is used.
PowerShell_WriteTextFile_.png
2. Get the .txt files from the current directory using Get-ChildItemcmdlet with  2 parameters: Filter (to return only the .txt files) and Recurse. The parameters are set by adding them in the Parameters collection.
PowerShell_GetChildItem.png
The result is a collection of FileInfo (it was changed using the TypeArgument property from Collection of PSObject to Collection of FileInfo).
3. Then we start a ForEach iteration, which will process each of the .txt files found at the previous step.
PowerShell_ForEachContent.png
4. For each file, we will use InvokePowerShell activity with Get-Contentcmdlet that will read the content of the file and save it into the contents collection.
PowerShell_GetContent.png
5. A message box with the first line of the file (index is 0  - contents(0).tostring) pops up.

We plan to develop more in the PowerShell area and we will try to improve both - the PowerShell activities pack and the specific documentation.
Note: The workflow is tested with UiPath Studio 8.
Attachments: