Thursday, February 1, 2018

UiPath Offline Activation(RPA)

This tutorial applies to versions 8 and 8.1. We strongly recommend updating to the latest stable version of UiPath Studio. 
In order to install UiPath on a machine where your network security software or a firewall prevents the access to our license validation website please follow the steps below.

Offline activation


Offline Activation for Studio Trial

1) When you first open UiPath Studio 8 there is a dialog asking if you want to Enter a key or Continue your trial. 
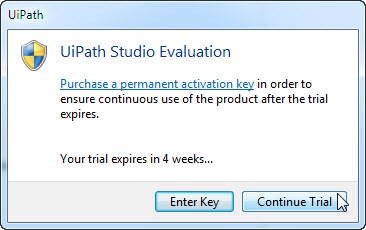
ContinueTrial
2) If you choose the second option, a registration dialog will open. Fill in your email and check Trial mode. 
Note: when activating the trial, no code should be used-the code field must be empty.
3) Click on the Offline button.
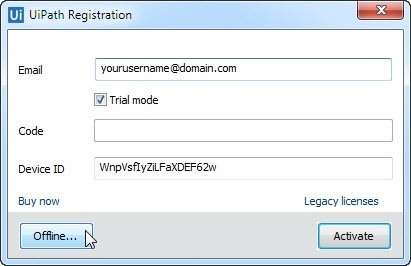
Offlineact
4) In the new dialog, save the generated data (Save to file button) to a txt file.
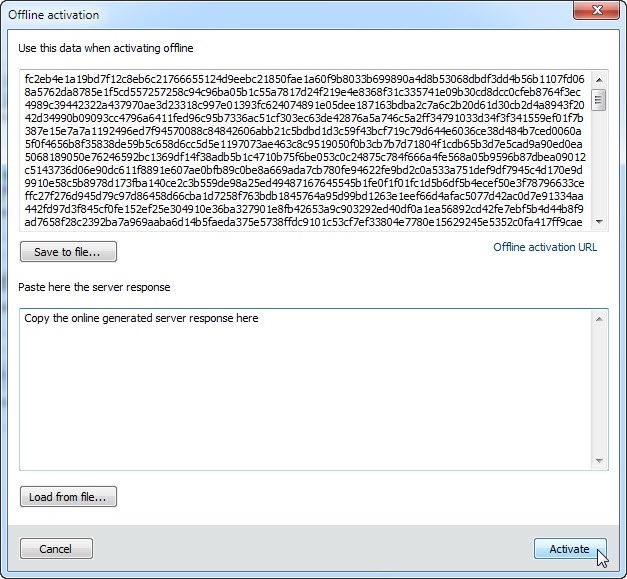
copyserverresponse
5) Send the file attached to email to another machine with no firewall/system security software that prevents the access to our online validation server. On the same machine, click on this Offline activation URL and copy the generated data from the txt file to the empty field in the page and click on Activate. 
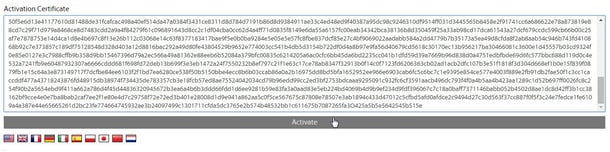
activationcertificate
New data - the response from server - will be generated. Copy and save the generated response from server to a txt file and copy/send it via email back to the machine with the firewall restriction.
6) In the UiPath offline activation window click on Load from file button (please see the image at point 4 above), locate and open the file with the online generated response from server and click on the Activate button. 
Your 60-day trial should now be activated.

Offline Activation - Paid License

1) In the same dialog mentioned at point 1) above click on Enter key.
Alternatively double click on Activate.exe in C:\Program Files (x86)\UiPath Studio\v8\UiPath.
2) In the registration dialog fill in your email and copy the license code.
3) Further click on the Offline button
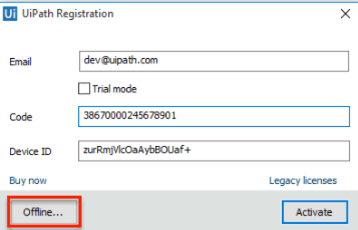
4) Follow the same indications described at steps 4 to 6 above to complete the offline activation process.

Publish and run a project package---UiPath(RPA)

There are four ways how you can run a process in UiPath Studio 8
  1. From UiPath Studio
  2. From UiPath Robot Agent
  3. From command line
  4. Through a REST command

UiPath 8 comes with a revamped deployment story that allows you to easily share your work with project mates by publishing them to a network drive. Robots see them, dependencies are resolved and starting them is no fuss.

In order to pack and publish a project follow the steps below

  1. Open UiPath 8
  2. Open the project that you want to share
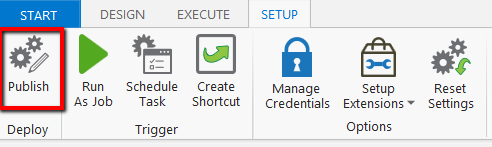
  3. Go to the Setup tab and click Publish
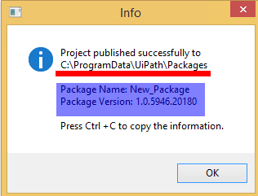
4. You will see a message box with some information about your package. 

publish-project-uipath.png
5. All packages are stored locally in  %ProgramData%UiPath\Packages 
  
After publishing the package, you can run it on any computer that has UiPath 8. Just copy the package to the same location, %ProgramData%UiPath\Packages, on the target computer

How to run a project package

The execution is done through our agent software that tracks all available and running processes.
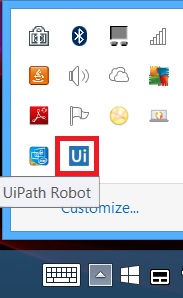
In order to have UiRobot Agent icon in the tray bar, when you install UiPathStudio.msi, you have to select the Automatically start client option.

1. Right click on UiRobot Agent icon

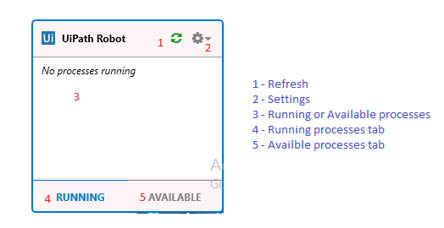
2. Go to Start and click on the package you want to execute.
publish-project-uipath-2.png

3. If the package doesn`t appear, go to Advanced and click Refresh packages (1).
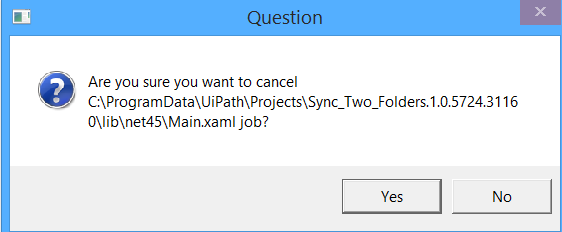
4. To stop a running process, select the RUNNING tab (4) select the process that you want to stop and click on the red square. You will be prompted to confirm the cancelation.

Start Process From Command Line--UiPath(RPA)

There are four ways how you can run a process in UiPath Studio 8
  1. From UiPath Studio
  2. From UiPath Robot Agent
  3. From command line
  4. Through a REST command
 This article's scope is to define and exemplify how you can start a process from command line in UiPath Studio 8 or higher. If you are still working with UiPath Studio 7.5 and upgrading is not an option you can check this article or this one.
UiPath Studio 8 comes bundled with UiRobot.exe application that allows you to execute processes without requiring UiStudio.exe.
This is very useful when you want to start a process from command line, a shortcut, a schedule or from your own application.
Syntax
"C:\Program Files (x86)\UiPath Studio\UiRobot.exe" /file:"full path of your workflow"
By default the location of UiRobot is: C:\Program Files (x86)\UiPath Studio\UiRobot.exe
Example:
Without arguments:
"C:\Program Files (x86)\UiPath Studio\UiRobot.exe"
/file:"C:\Users\Iordache Razvan\Documents\UiPath\OpenExcelApp\Main.xaml"
With arguments:
"C:\Program Files (x86)\UiPath Studio\UiRobot.exe"
/file:"C:\Users\Iordache Razvan\Documents\UiPath\StartFromCmd\Main.xaml"
/input:"{'arg1':'hello'}"

Command line arguments 

/f: /file:  Mandatory      Absolute path to xaml file that defines the process you want to startRemarks     Make sure to quote the path if it contains spaces
/i: /input
     A dictionary of input parameters to the workflow, keyed by argument name
Remarks     The dictionary must be in JSON format and should contain only standard types
/executor
     If passed, the process will be executed in an interactive Windows session
Remarks
    This or /process argument must be specified.
     The Windows session in which the process will be executed is defined by the credential specified through /target argument. If /target is not passed then the process will execute in the current user session
/process
      If passed, the process will be executed in Windows session 0
Remarks
     This or /executor argument must be specified.
      This should be used only when starting a process from Windows Task Scheduler or if /target argument is passed. The user account that hosts the process must have Log on as batch job permission
 /target
      The name of the credential stored in Windows Credential Store
Remarks      In order to start a project in Windows Session 0 a username and its password are required. 
To avoid passing them directly into command line, you can store them in Windows Credential Store and pass only the credential name. If /executor is specified, then UiPath automatically logs in a Windows session for the user if one doesn't exists

/monitored
      If passed, UiPath monitors the user's interactive session
Remarks      Now processes can run even when the desktop is locked. To achieve this, UiPath must be instructed to monitor the Windows session in order to automatically unlock the screen and keep executing the process. Ex: Human user can start a lengthy process then lock the desktop and go to lunch.

How to: Schedule a Task----UiPath(RPA)

Note: This feature is deprecated. 
*this feature is not compatible with UiPath 8.0 or lower version 
*this feature is not compatible with the Community Edition

Schedule Task

Schedule Task is a feature in UiPath Studio that provides the ability to schedule a process to be executed at predefined time or after specified time intervals for current user. Check this article to schedule a task for a different user manually.

Where do I find Schedule Task?

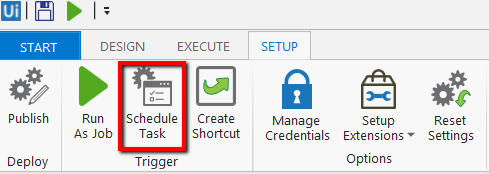
In UiPath Studio, go to Setup tab and click Schedule Task.
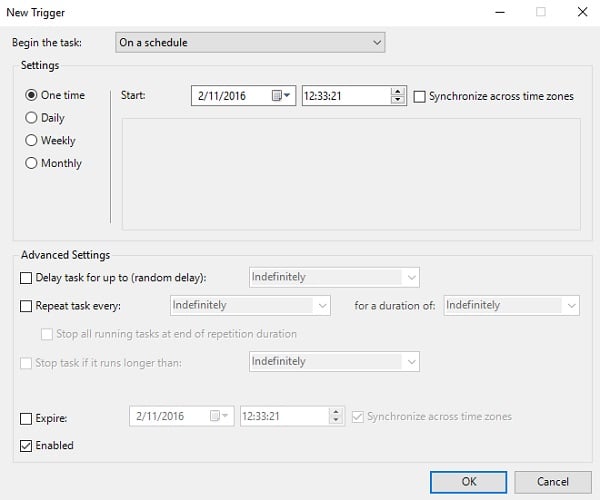
After you click on Schedule Task the following window will be displayed.
  • In UiPath Schedule Task window we can schedule a task only using the default trigger: On a schedule (Time-based triggers include starting a task at a specific time of day or starting a task multiple times on a daily, weekly, or monthly schedule).
  • You can choose from the available settings: One time, Daily, Weekly or Monthly (Start date and hour)
  • Advanced settings

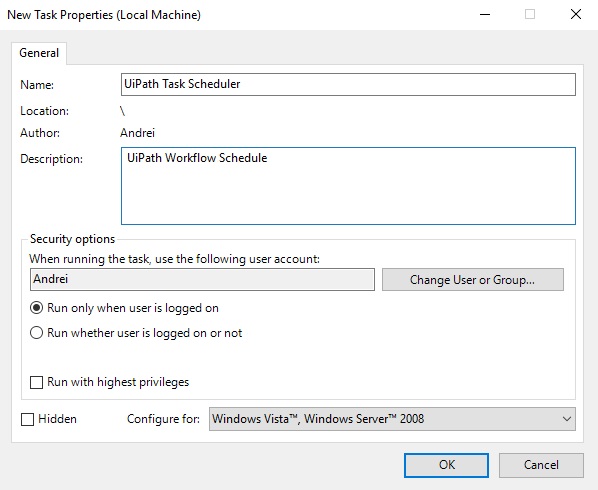
Now let's go over the available options in the next dialog:

  • Name: the name of the scheduled task (in our case the default is the Project / Process name). To schedule the same process more than once you have to change the name (e.g. "UiPath Task Scheduler" and "UiPath Task Scheduler 2").
  • Location: is the local folder in Windows Task Scheduler (e.g. C:\Windows\System32\Tasks\UiPath each task created with UiPath are saved in this folder)
  • Run only when user is logged on: the task will be executed in the Windows session of the currently logged on user.
  • Run whether user is logged on or not:  if the account is not logged on when the corresponding task is triggered, the service will use the saved credentials to run as the specified account in Windows session 0. You may be prompted to supply the credentials of the account when saving the task. UiPath doesn't store your username and password when are requested to create a new task. All these information are stored in Windows Credential Store. Make sure the Logon as batch job policy is set for the user.

Session 0 Isolation Explained

Each user that logs on to Windows is placed in a separate session. During startup, Session 0 is created and additional sessions are created as needed. Services always run in Session 0. For more details about this please check the following link.
Session 0 doesn't have a graphic interface
The easiest way to make your task interact with the UI is to split your project / process into small workflows. 
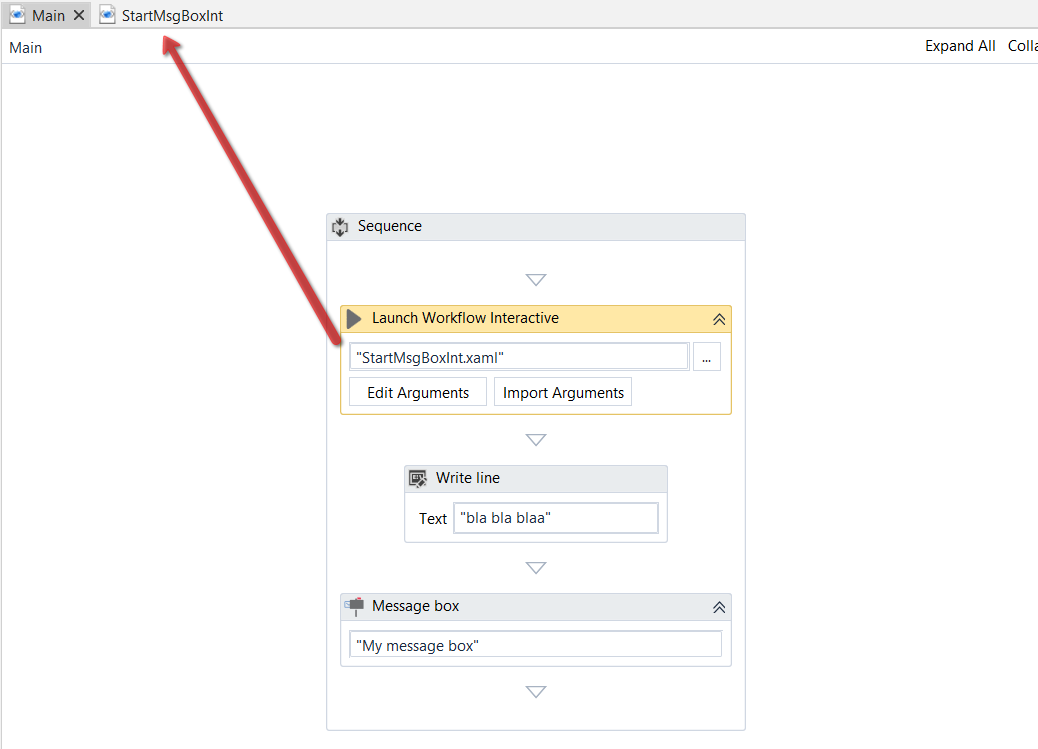
Workflows that interact with UI must be started from the main workflow through Launch Workflow Interactive activity (this activity automatically logs in an interactive Windows session if necessary)
Eg. 
The third activity will execute but you won't be able to see the message box. This is why it should be added into StartMsgBoxInt workflow.
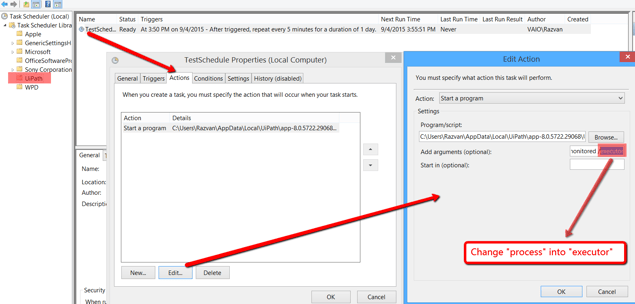
As a backup solution you could change the commands line arguments of UiRobot. To do this go to Windows Task Scheduler -> UiPath Folder->Right click on your task and then select Properties -> Actions -> Edit . In Edit window change the word "process" with "executor".
 Now your task will be executed in the user account specified when prompted for credentials.
 NOTE: If you are scheduling the task in a Virtual Machine, make sure to add "/cc /preferConsole" parameters manually in the action.


Start Process, Debug, Break Points add IN UiPath Studio(RPA)

There are four ways how you can run a process in UiPath Studio 8
  1. From UiPath Studio
  2. From UiPath Robot Agent
  3. From command line
  4. Through a REST command
Opening a project
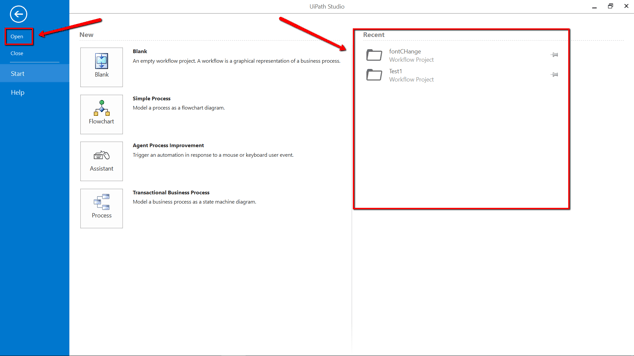
There are two options available opening a project, by using the recent section on the right side of Start pane or by using the Open button in the top left corner of the window.
Running a project
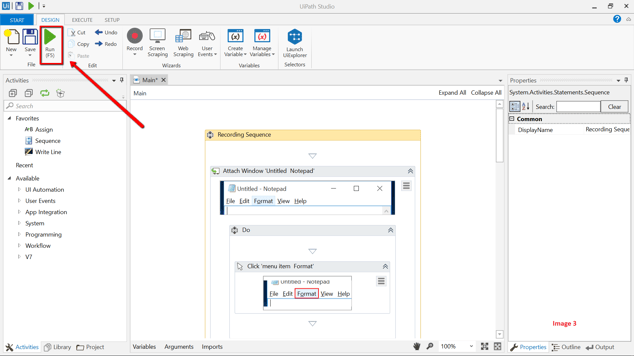
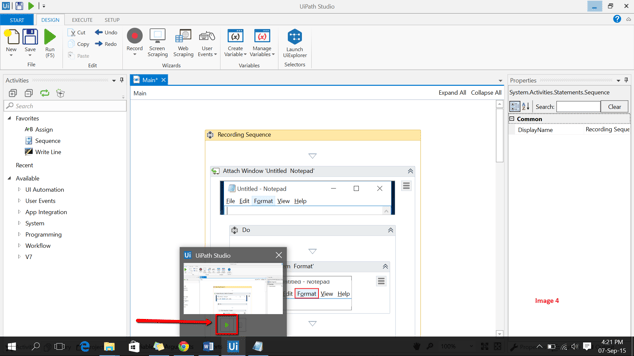
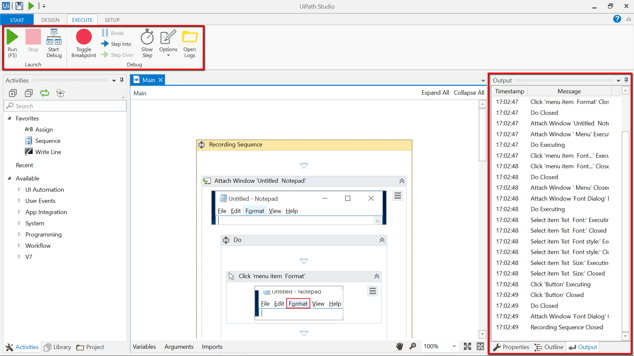
To run a project from UiPath Studio you can either use the Run button from design tab(F5) or the Run button that appears when hovering over the Studio icon.
Debugging a project
UiPath Designer Surface allows you to observe the execution of a project and check it for errors.
This is useful for watching what an activity does, verifying the state of the project and the components with which it interacts and where does the project go wrong.
Visual Tracking
If you choose to run the project under the debug mode each activity that is executed at a specific moment is highlighted in the Designer Surface and its state is logged in the Output pane.
You can also choose to Highlight the UI Elements for every activity of the project so that you can visually identify which UI control is used by the currently running activity.
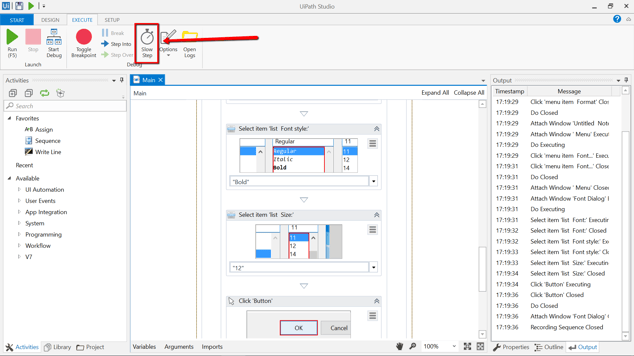
Slow execution
Unlike the normal running of a project, in debug mode the project is executed according to your settings .
Although you cannot change the order of the activities nor skip one, you can use step by step execution to get the chance of watching the project closely.
Normally the project is executed as fast as possible, but, when debugging, there is a slow step option which you can use.
Breakpoints and Step by step execution
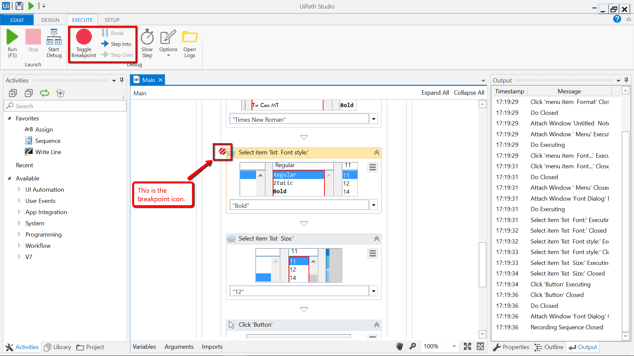
You can bound breakpoints to activities. "Toggle breakpoint" will attach or detach a breakpoint to the selected activity even while debugging.
If a breakpoint is hit the execution of the project will pause before the end of currently running activity and will resume only when you enable it by using the "Step Into" buttons, you can even skip an activity by using the “Step Over” button.
You can also pause the project by using the “Break” button.
It is recommended to use breakpoints when you want to pause the debugging at a certain activity, so you can inspect the data it is working with and the current result.
Stopping a project
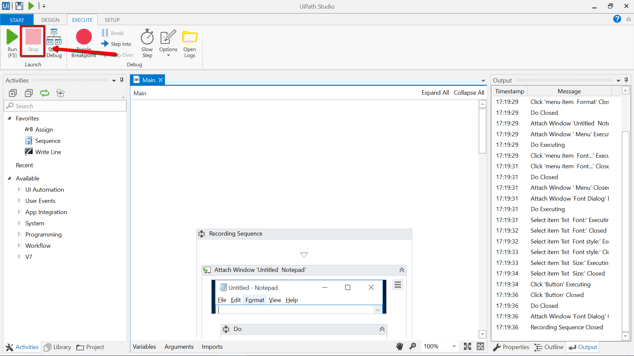
In UiPath Studio, you can stop the running of a project, normaly or in the debug mode,  with a simple button in the user interface. You can find this button in the Execute tab, between the Run and Start Debug Buttons.

UIPATH Logging Overview(RPA)

UiPath 8 brings architectural changes that improve the overall reliability and performance. Workflow execution was moved from UiPath Studio application to UiRobot, our dedicated execution engine. 
UiRobot has a multi-process architecture similar to Chrome, that offers the option to execute each workflow in a separate UiRobot process, called Executor. Executors are managed by a special instance of UiRobot, simply called Robot. This way, if any Executor crashes, the main process won't be affected and it will continue running. 

Client Logging

UiPath relies on NLog, making it easy and flexible to integrate with databases, servers or any other NLog targets. Logging can be configured through NLog.config file. UiStudio, Robot and workflow execution generate log messages on the client side.
  • Messages produced by workflow execution are logged withExecution logging source. UiStudio logs as the Studio source. Messages produced by the Robot instance or related to the management of the executors are logged with a Robotlogging source.
  • By default, Execution and Studio logs are stored locally in %LocalAppData%/UiPath/Logs
  • All warnings and errors generated by Robot are saved to Windows Event Log, accessible via Windows Event Viewer
  • We have two activities that may be used for logging: Log Message and WriteLine. WriteLine activity logs with Trace level
  • An automatic logging mechanism for all execution steps, including the values of variables and arguments may be enabled in UiRobot.exe.config by setting LogParameters to 1 instead of 0 in<switches> section

Server Logging

If you have configured UiPath Server, all logs generated by Execution are also sent to the server. You can thus follow how each robot is doing in the Monitoring platform.

How to Edit 7.5 projects with UiPath 8---UiPath(RPA)

The main question when you upgrade from UiPath 7.5 to version 8 is:  "Will the old processes work as expected?" The answer is "Yes". You can run or edit a workflow made with 7.5 as long as UiPath.V7.Activities package is installed.
You can find every package that you need in Manage Packages.
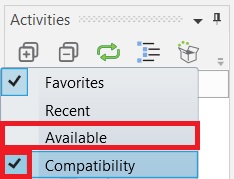
It is not recommended to use UI Automation activities from version 8 along with UI Automation activities from v 7.5 in the same workflow. To see the compatible activities, you can check theCompatibility option from the Activities Panel. To ensure you don't mix the activities from different versions it is best to check the "Compatibility" and uncheck the "Available" options. This way you will find in the Activities panel only the activities for UiPath 7.5 .

How to spot the difference between an activity from V7.5 and one from V8?

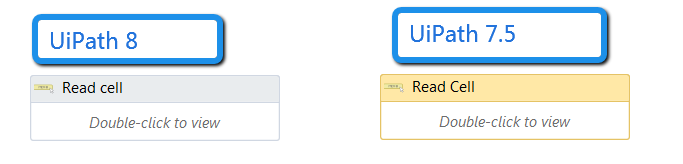
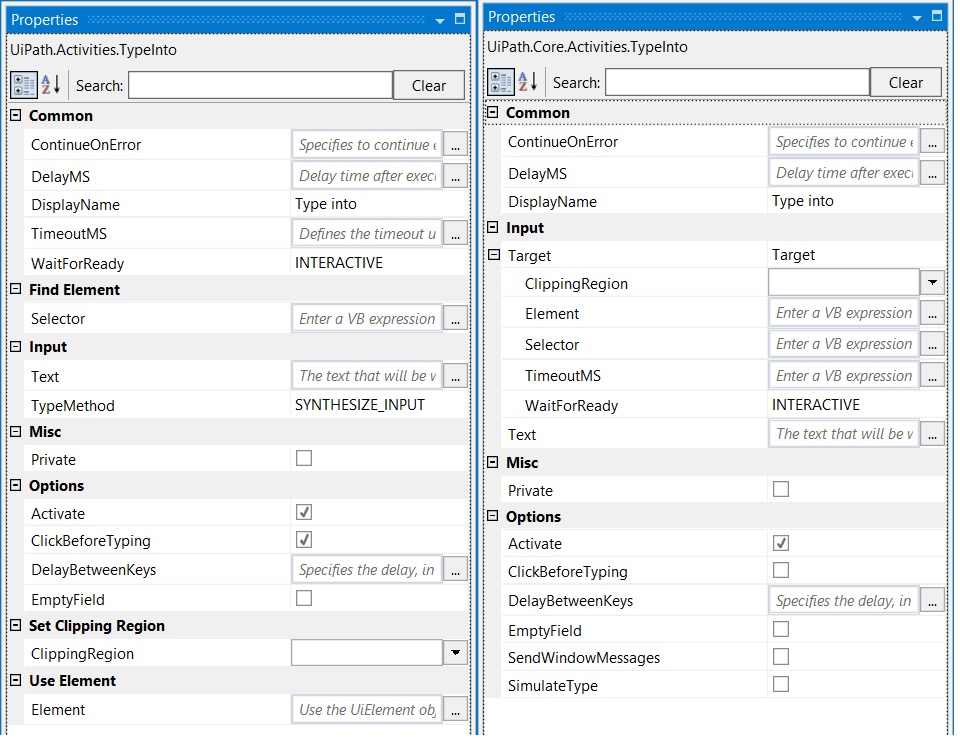
At first sight some of the compatibility activities seem indistinguishable from the new ones, but if you look at the properties panel you will see some differences. The name of a V7 activity starts with UiPath.Activities. By contrast, the names of the new UI Automation activities start with UiPath.Core.Activities. 
Here are the properties for the Type Into activity. On the left side you have the properties of V7 "Type Into" and on the right side you have the properties for the V8 one.